[Index]
[Previous Chapter: Firewall Phases and Actions]
Chapter 5: Using the Firewall Control Panel
It is recommended that the first stage in configuring your virtual firewall should be to define names for any networks or hosts that you think you may need to refer to. This adds flexibility since if the address of one of these networks or hosts subsequently changes, you will only need to update your firewall configuration in one place. Furthermore, if you are administering multiple virtual firewalls it is worth noting that names you define are common to all the firewalls you administer: you only need to define each name once, and a change to address will affect all the firewalls that refer to it. A host address is normally just a special case of a network address; an address with netmask 255.255.255.255, and hence in most cases the FireRack will allow you to use the addresses of hosts and networks interchangeably.
The 'Host and Network Names' section on the control panel has three tabs, which allow you to list networks (anything with a netmask other than 255.255.255.255), only hosts or all of them together. This separation is purely for convenience, and you may define an additional host or network by clicking on the 'Add New Name' button regardless of which list is being displayed.

The above image shows an example of a network definition. The 'Display Name' is the name which will be listed in the rule definition and appear when a rule is displayed. You may type any valid netmask free-form into the 'Netmask' box, or you may click on one of the buttons 'Host', 'Class A', 'Class B' or 'Class C' to automatically enter a corresponding netmask. Entering a netmask of '255.255.255.255' (or clicking 'Host') will unveil some additional options which are available only for host definitions:
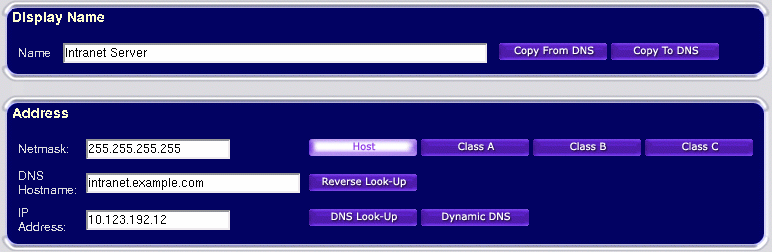
A parameter that exists for host addresses that does not exist for networks is the DNS name. This is not a required parameter, however it can prove useful. Rather than entering the IP address of a host, you may instead prefer to enter its DNS name. You may then automatically fill in the IP address by clicking on the 'DNS Look-up' button. Alternatively, having manually entered an IP address, you may fill in the DNS name by clicking on 'Reverse Look-up'. This could help to give you visual confirmation that you have entered the correct address.
In situations where your hosts have memorable DNS names, you may wish to use the same name for the display name. To avoid the need for double entry of names in such situations, buttons have been provided to copy the display name from the DNS name and vice versa.
Normally, the contents of the DNS name field is not used by the firewall, and serves only for user convenience. It is the contents of the IP address field that is used by the firewall. However, as a special case you can have the firewall dynamically fetch the current IP address (or set of addresses) from the DNS whenever it reloads the rules. To use this feature ensure you have supplied a DNS name and click 'Dynamic DNS'. The word 'DYNAMIC' will appear in the IP address field when this feature is enabled. Please be aware this is not as secure as a statically supplied IP address, and should not be used for critical rules. If you need to allow yourself remote access to services in your security zone from dynamically changing remote IP addresses it is strongly recommended you set up a VPN for this purpose.
Firewall rules are created and manipulated via the Firewall Rules section of the control panel:
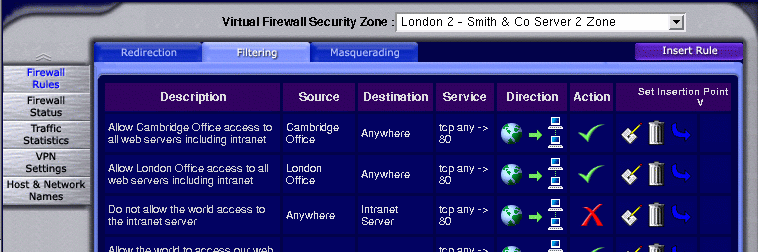
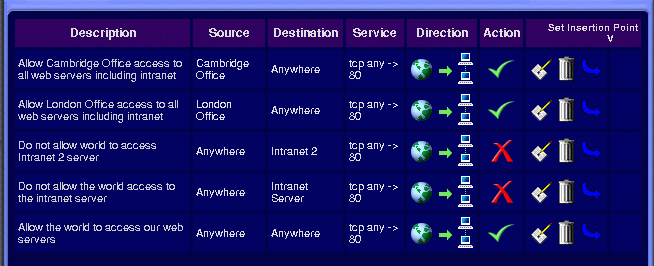
The pull-down list box at the top of the frame gives the name of the zone currently being manipulated. If you manage multiple zones you can use the list box to navigate between them quickly. Underneath the list box are three tabs; one for each phase of the firewall. As you can see, the currently selected tab is 'Filtering' our filtering rules are listed below. The rules show are our example for the Intranet server as given in an earlier chapter.
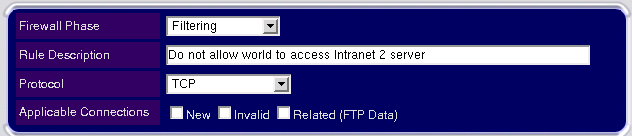
In the top section, we enter a description for the rule and choose 'TCP' from the pull down list of protocols (since we are creating a rule to block HTTP, which is a TCP protocol):
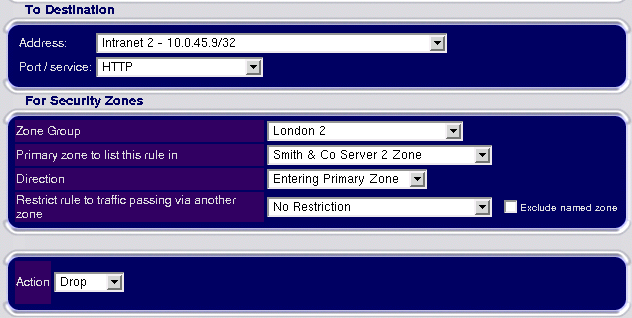
We do not need to specify a source address: it will default to anywhere, which is what we need. We select 'Intranet 2' from the destination address list box and choose HTTP from the port/service list. We do not need to change the Zone Group or Primary Zone: we were already in the correct zone when we clicked on 'Insert Rule'. We do however need to change the direction of the Rule: this defaulted to 'Leaving Primary Zone', but we want to write a rule for traffic entering our zone, so we select 'Entering Primary Zone' from the pull down list. Finally, we want to block the traffic so we choose an action of 'Drop':
Once the rule has been fully specified, we click the 'Save As New' button and we have successfully inserted the rule:
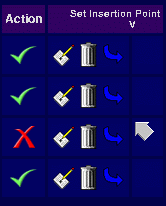
To edit a rule, click on the edit symbol ( ) adjacent to the rule. You will be taken the rule editing page, as when creating new rules. When you have finished making your alterations, click on 'Save' to update the rule. Alternatively, you may click on 'Save As New' to create a new rule, leaving the original rule unchanged. This allows you copy a rule.
It is possible to use the rule editing page to move or copy a firewall rule into another phase and/or security zone. To move or copy the rule to another phase, select the new phase from the pull down list in the top section. Please note that this may affect other parameters of the rule, such as its action, since some actions are only available in certain phases. To move or copy the rule to another zone, select the target zone from the 'Primary Zone' list box. Note that zones are grouped by the FireRack firewall to which they belong. To select a zone located on a different firewall, you must first select the zone group for that firewall.
To move a rule to a different position within a list, first set the insertion point pointer as you would do when creating a new rule. Then, click on the curved blue arrow ( ) adjacent to the rule you wish to move. The rule will then jump to the marked insertion point.
To delete a rule, click the bin icon ( ) adjacent to the rule. You will be prompted for confirmation.
[Index]
[Previous Chapter: Firewall Phases and Actions]